


Jatoba hardwood is famous for looking special and being super strong. But to keep it looking good for a long time, you need to look after it well. Usually, every ten years or so, you’ll need to give your Jatoba hardwood floor a touch-up, just like most other wood floors.
Refinishing Jatoba Hardwood Floors
Here’s a simple guide to doing that:
Step 1: Getting Ready
Before you start working on your Jatoba hardwood floor, make sure the room is empty. Take out all the furniture, rugs, curtains, and anything else. Use plastic sheets and tape to cover the doors and electrical outlets. Since you’ll be sanding, get ready for a lot of dust. Try to keep the dust from spreading to other rooms by covering stuff there too.
Check the floor for any nails or staples sticking out. Hammer them down so they don’t mess up the sanding.
Step 2: Sanding the Floor
This part is about getting rid of the old finish on your Jatoba hardwood floor. You’ll need a sander for this. There are different kinds, but you want one that’s good for hardwood floors. Before you start, get a demo on how to use it properly.
Attach sandpaper to the sander and start sanding. Go with the wood grain, and work from the middle of the room outwards. Don’t forget the corners and other nooks.
Some Extra Tips:
- Wear a mask, glasses, and earplugs to protect yourself.
- Try the sander on a small area first.
- After sanding, vacuum up all the dust well.
Step 3: Staining (Optional)
If you want to change the color of your floor, you can apply a stain. Use a brush or a clean cloth. Let each coat dry before adding another. If you’re not sure about this part, it’s best to ask for help.
Step 4: Adding the Finish
Get some polyurethane finish and put it on your prepared floor. You can use a brush, cloth, or roller. Start from the corners and work towards the door. Read the instructions on the container carefully.
Let each coat dry completely before adding another. It might take a few hours for each coat to dry. After you’re done, wait for the floor to dry overnight before moving any furniture back in.
If you’re not up for doing this yourself, you can always call in the professionals to take care of it for you.
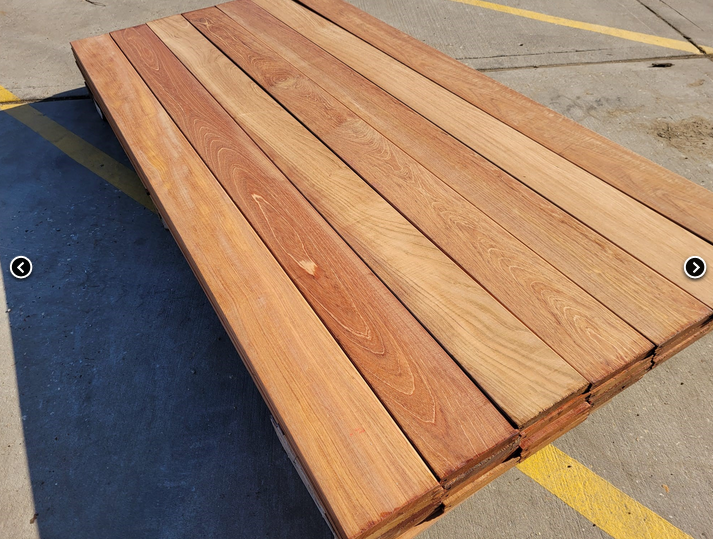
Jatoba Hardwood Decking ***FSC®***
Jatoba 21 x 145mm Smooth 2 sides – Grooved for hidden fix – 1st Grade

Key Features
- FSC Certified
- Extremely Durable
- Excellent value and quality hardwood decking
- Kiln Dried to 14-16% for stability
- Hidden fix system
- We recommend ‘Extreme4 Hidden Fix Kits’
- Also known as Brazilian Cherry Wood
Jatoba 21 x 145mm Smooth 2 sides – 1st Grade
Key Features
- FSC Certified
- Extremely Durable
- Excellent value and quality hardwood decking
- Kiln Dried to 14-16% for stability
- Also known as Brazilian Cherry Wood
FAQs
Why do I need to sand my Jatoba hardwood floor?
Sanding helps remove the old finish and makes the floor smooth again. This step prepares the floor for a new finish, keeping it looking nice.
Is staining necessary for my Jatoba hardwood floor?
Staining is optional. It’s used if you want to change the color of your floor. If you’re unsure, it’s best to ask someone for advice.
What should I do if I don’t want to do the refinishing myself?
If you don’t want to do the refinishing yourself, you can hire professionals to do it for you. They have the expertise and tools to get the job done well.
How long does it take for the finish to dry?
Each coat of finish can take a few hours to dry completely. It’s important to let each coat dry before adding another one. After you’re done, wait overnight before moving furniture back onto the floor.
How can I protect myself from the dust when sanding?
To protect yourself from dust when sanding, wear a mask, safety glasses, and earplugs. This will help keep dust out of your lungs, eyes, and ears while you work.
